Battery switch on travel trailer function is crucial for managing your RV’s power. Understanding how your battery switch works is key to avoiding dead batteries and electrical issues. This guide will walk you through the different types of switches, how to use them safely, and troubleshooting common problems. We’ll cover everything from connecting your batteries to maintaining them, ensuring you’re ready for your next adventure.
Whether you’re a seasoned RVer or a newbie, this guide will equip you with the knowledge to confidently manage your travel trailer’s power system. We’ll delve into the specifics of different battery switch types, the importance of safe disconnections, and how to diagnose and fix common problems. Get ready to master your RV’s electrical system!
Understanding Battery Switch Functionality in Travel Trailers: Battery Switch On Travel Trailer Function

Your travel trailer’s battery switch is a crucial component for managing power and protecting your batteries. It allows you to disconnect your house batteries from the trailer’s electrical system, preventing drain and protecting them from damage. Understanding how it works is essential for maintaining your trailer and ensuring you have power when you need it.
A battery switch acts as a gatekeeper for your trailer’s battery power. It lets you select which battery bank (or both) provides power to your trailer’s 12-volt system. This is particularly useful for managing multiple batteries (like a deep-cycle house battery and a starting battery for your tow vehicle), preventing accidental discharge, and performing maintenance.
Types of Battery Switches
Travel trailers commonly use a few different types of battery switches. The most prevalent are the 1-2-Both switches and the 1-2-Off switches. Understanding their differences is key to selecting and using the right one for your needs.
Battery Switch Operation
Operating your battery switch is straightforward but requires careful attention. Incorrect use can lead to battery drain or damage.
- Identify your switch type: Determine whether you have a 1-2-Both or a 1-2-Off switch. This will dictate the positions you can select.
- Locate the switch: The switch is usually located in a readily accessible area, often near the battery compartment or inside a storage compartment. It might be labeled clearly or might require a bit of searching.
- Select the desired position: For charging both batteries, select “Both.” To use only one battery bank, select either “1” or “2”. To completely disconnect both batteries, choose the “Off” position (if available).
- Confirm the connection: After selecting your position, take a moment to ensure the power is flowing as expected. Check the lights or appliances that run on the 12-volt system.
Comparison of Battery Switch Types
| Feature | 1-2-Both Switch | 1-2-Off Switch |
|---|---|---|
| Positions | 1, 2, Both | 1, 2, Off |
| Advantages | Convenient for charging both batteries simultaneously; Simple operation. | Provides complete battery disconnection for storage; Prevents parasitic drain. |
| Disadvantages | No complete disconnect; Potential for unintended drain if one battery is weak. | Requires an extra step to disconnect; Slightly more complex. |
Connecting and Disconnecting Batteries
Properly connecting and disconnecting your travel trailer’s battery is crucial for both safety and maintaining the battery’s lifespan. Understanding the process and practicing safe techniques will prevent damage to your equipment and ensure you’re always ready for your next adventure.Connecting your travel trailer’s battery to your vehicle’s charging system allows you to charge the trailer battery while driving. This is essential for maintaining power for lights, appliances, and other systems while you’re on the road.
Disconnecting the battery prevents unwanted power drain when the trailer is not in use, which is important for preserving battery life and avoiding a dead battery.
Connecting the Trailer Battery to the Vehicle’s Charging System
This usually involves a 7-pin or 7-way connector, and a charging cable running from the vehicle to the trailer. Ensure the connector is firmly plugged in on both ends. A properly connected system will provide a reliable charge to your trailer’s battery while the vehicle’s engine is running. Improper connections can result in poor charging or even damage to the charging system.
Always check the connection points for any signs of corrosion or damage before each use.
Safely Disconnecting the Batteries
Before disconnecting the battery, always turn off any appliances or devices powered by the trailer battery. Then, disconnect the negative (-) terminal first, followed by the positive (+) terminal. This prevents accidental short circuits. When reconnecting, reverse the process: connect the positive (+) terminal first, then the negative (-) terminal. Use insulated tools to avoid accidental shocks.
Leaving the battery disconnected when not in use prevents parasitic drain and keeps your battery charged and ready for your next trip.
Maintaining Battery Connections to Avoid Corrosion
Battery terminal corrosion is a common problem that can lead to poor connections and reduced battery life. Regular cleaning of the terminals with a wire brush and baking soda solution is recommended. Applying a battery terminal protector after cleaning helps prevent future corrosion. Inspect the connections regularly for any signs of damage or looseness. Tightening loose connections is a simple preventative measure that can save you significant headaches down the road.
So, you’re an audiophile who travels? Awesome! Check out this guide on creating the perfect audiophile travel setup to ensure your ears are happy on the go. It’s crucial to protect your investment, so don’t forget to look into travel insurance too. Getting Aon travel insurance might be a smart move, covering your expensive gear against loss or damage.
Peace of mind is priceless, right? Happy travels!
Pre-Trip Battery Inspection and Connection Checklist
Before each trip, a quick inspection of your battery and connections is essential. This preventative measure can avoid many problems on the road.
- Visually inspect the battery for any signs of damage, such as cracks or leaks.
- Check the battery terminals for corrosion. Clean them if necessary.
- Inspect the battery cables for any signs of damage or fraying.
- Ensure all connections are tight and secure.
- Connect the trailer’s charging cable to your vehicle.
- Test the battery voltage with a multimeter to ensure it’s fully charged.
Troubleshooting Common Battery Switch Issues
Dealing with a malfunctioning battery switch in your travel trailer can be frustrating, but systematic troubleshooting can often pinpoint the problem quickly. This section will guide you through identifying and resolving common issues, helping you get back on the road with power to your appliances.Troubleshooting a non-functioning battery switch usually involves checking connections, the switch itself, and the battery’s health.
So, you’re an audiophile who travels? Awesome! Check out this guide on audiophile travel setups to make sure your ears are happy on the go. It’s crucial to protect your gear, and yourself! Speaking of protection, don’t forget to sort out your travel insurance before you jet off. Getting Aon travel insurance gives you peace of mind knowing you’re covered for unexpected events, allowing you to focus on enjoying your trip and your amazing music.
Happy travels!
Low voltage or a complete lack of power to your appliances points to problems within the electrical system, often stemming from the battery switch or its related components.
Battery Switch Failure to Switch, Battery switch on travel trailer function
A battery switch that fails to switch between positions (battery, shore power, or both combined) often indicates a problem with the switch mechanism itself or a faulty connection. First, visually inspect the switch for any signs of damage, such as loose wires, corrosion, or broken parts. Carefully tighten any loose connections. If the problem persists, the switch may need replacement.
Consider using a multimeter to test the continuity of the switch in each position to confirm whether it’s electrically functioning correctly. A simple continuity test can quickly rule out an internal switch failure.
Poor Battery Switch Connections
Loose or corroded connections at the battery switch are common culprits for electrical problems. Corrosion can significantly impede current flow, leading to low voltage or no power. Clean the battery terminals and the switch connections thoroughly using a wire brush and a battery terminal cleaner. Apply a corrosion inhibitor to prevent future corrosion. Ensure all connections are tight and secure.
If corrosion is severe, you may need to replace the corroded parts of the connection.
Diagnosing Low Battery Voltage or No Power to Appliances
Low battery voltage or no power to appliances points to a problem within the electrical system. Begin by checking the battery’s voltage using a multimeter. A reading significantly below the expected voltage (usually around 12.6V for a fully charged 12V battery) indicates a charging problem or a weak battery. Next, verify that the battery switch is correctly positioned for the desired power source (battery or shore power).
Then, inspect all wiring and connections between the battery switch, the battery, and the appliances for any loose connections or corrosion. Trace the wiring from the battery switch to the appliances to identify any breaks in the circuit. A multimeter can be used to check for continuity along the wiring paths. If the problem persists after checking these components, more in-depth electrical troubleshooting may be necessary.
Troubleshooting Battery Switch Problems Flowchart
The following flowchart provides a visual guide to troubleshooting battery switch problems:
Start -> Inspect switch for damage/loose wires -> Tighten connections -> Test switch functionality (multimeter) -> Switch works? (Yes -> End; No -> Replace switch) -> Inspect battery terminals for corrosion -> Clean and tighten connections -> Test system -> Power restored? (Yes -> End; No -> Check battery voltage (multimeter) -> Voltage low? (Yes -> Charge battery; No -> Check wiring for breaks/corrosion -> Repair/replace wiring -> Test system -> Power restored?
(Yes -> End; No -> Consult professional electrician))
Battery Switch and Electrical System Integration
Your travel trailer’s battery switch isn’t a standalone component; it’s a crucial part of a larger electrical system. Understanding how it interacts with other parts like the converter and inverter is key to maintaining power and preventing damage. This section will explore this interaction, highlighting the differences between battery types and potential issues.The battery switch acts as the central control point for your trailer’s battery power.
It determines which power source – your house batteries or shore power – feeds the various systems. When the switch is in the “house” position, the house batteries supply power to the trailer’s 12V circuits. This power then typically goes to the converter, which steps up the 12V DC power to 120V AC to run things like your lights and appliances.
If you have an inverter, it takes 12V DC from the batteries and converts it to 120V AC for specific appliances. Switching to the “shore” position directs power from the campground’s electrical hookup directly to the converter, bypassing the house batteries. This often also charges the batteries. Finally, the “off” position disconnects both sources, preventing accidental drain.
Battery Type Impact on Switch Performance
Different battery chemistries, like lead-acid and lithium, have varying voltage outputs and charging requirements. Lead-acid batteries, while common and relatively inexpensive, have a lower voltage output and can be more susceptible to sulfation if not properly charged. Lithium batteries, on the other hand, offer higher voltage and faster charging, but require specific charging profiles that the converter may not always be able to handle.
Therefore, a battery switch needs to be compatible with the type of battery being used. Using a lead-acid battery switch with lithium batteries might not provide the correct charging voltage or current, leading to premature battery wear or even damage. Conversely, a lithium battery switch with lead-acid batteries may not charge the lead-acid batteries efficiently.
Faulty Battery Switch and Electrical Component Damage
A malfunctioning battery switch can cause several problems. For example, a switch that fails in the “on” position could constantly drain your house batteries, even when not connected to shore power. This could lead to a completely discharged battery bank, potentially causing damage to sensitive electronics or rendering your appliances unusable. Conversely, a switch that fails in the “off” position might leave your batteries connected to a faulty circuit, potentially causing a short circuit and damaging other components in the system.
A switch that fails to properly connect to shore power could also prevent your batteries from charging. Imagine being in a remote location with a dead battery bank due to a faulty switch. That’s why regular inspection and maintenance are crucial.
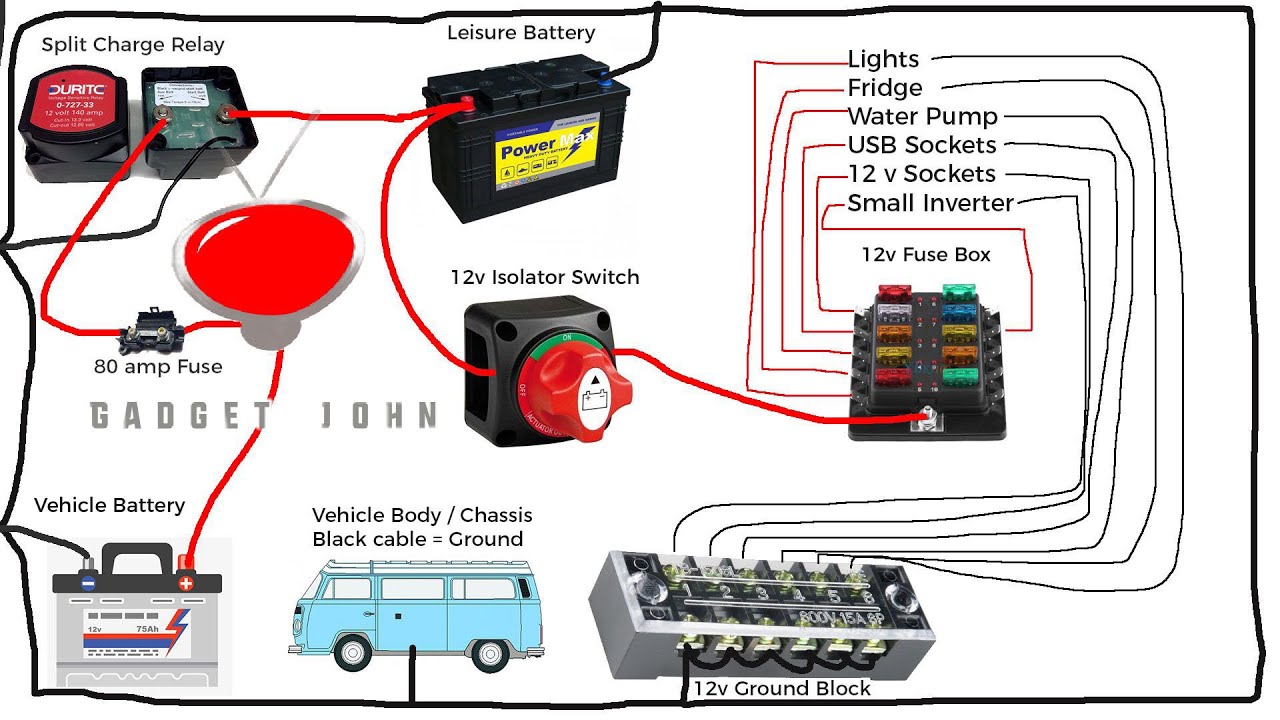
Electrical System Diagram
A simplified diagram showing the flow of electricity. The battery switch is positioned centrally, controlling the flow from either the house batteries (12V DC) or shore power (120V AC) to the converter (converting 12V DC to 120V AC), inverter (converting 12V DC to 120V AC), and finally to the trailer’s 12V and 120V appliances. Arrows indicate the direction of electrical flow. Separate lines depict the charging path from shore power to the batteries. A fuse or circuit breaker is shown in the line between the battery switch and the house batteries to protect against overcurrent situations.
Safety Precautions and Best Practices
Working with batteries and the electrical systems in your travel trailer requires caution. Improper handling can lead to serious injury, including burns, explosions, and electrical shock. Always prioritize safety when working with these components. This section Artikels crucial safety measures to ensure a safe and successful experience.
Safety is paramount when dealing with your travel trailer’s electrical system and batteries. This involves more than just knowing how to operate the battery switch; it’s about understanding the potential hazards and taking appropriate steps to mitigate risk. Remember, even seemingly minor mistakes can have significant consequences.
Personal Protective Equipment
Always wear appropriate personal protective equipment (PPE) when working with batteries and electrical connections. This includes safety glasses or goggles to protect your eyes from splashes of battery acid or flying debris, and heavy-duty gloves to protect your hands from cuts, corrosion, and chemical burns. Rubber gloves are particularly important as they provide insulation against electrical shock. Consider wearing long sleeves and pants to protect your skin.
Risks of Improper Battery Handling
Improper handling of batteries can lead to several dangerous situations. Connecting the positive (+) and negative (-) terminals incorrectly can cause a short circuit, generating intense heat, sparks, and potentially an explosion. Spilled battery acid is corrosive and can damage your skin, eyes, and clothing. Additionally, the gases released by batteries are flammable and can ignite if exposed to sparks or flames.
Never work near open flames or sparks while handling batteries.
Proper Battery Disconnection and Reconnection Techniques
When disconnecting a battery, always disconnect the negative (-) terminal first, and reconnect it last. This helps prevent accidental short circuits. Use a wrench or pliers specifically designed for battery terminals to avoid damaging them. Before touching any terminals, ensure your hands are dry and clean. When reconnecting, ensure a secure connection, but avoid over-tightening, which could damage the terminals.
Keep a close watch for any sparks or unusual smells. If you notice anything amiss, immediately stop and assess the situation. If you’re unsure about any aspect of the process, seek assistance from a qualified professional.
Battery Switch Maintenance and Replacement
Keeping your travel trailer’s battery switch in top condition is crucial for reliable power and preventing costly repairs down the road. Regular maintenance ensures a smooth flow of electricity to your appliances and prevents potentially dangerous situations caused by corroded connections or a malfunctioning switch. Neglecting maintenance can lead to premature failure of the switch and even damage to your batteries or other electrical components.
Routine Inspections and Cleaning
A simple visual inspection and cleaning of your battery switch and connections should be part of your regular pre-trip checklist. This prevents buildup of corrosion which restricts current flow and can lead to overheating and failure. A schedule of monthly inspections during heavy use periods and at least quarterly inspections during less frequent use is recommended. This allows for early detection of any issues before they escalate.
Cleaning Battery Terminals and Connections
To clean your battery terminals and connections, you’ll need a wire brush, baking soda, and water. First, disconnect the negative battery cable from the battery. Then, use the wire brush to remove any corrosion from the terminals and the connection points on the battery switch. Mix a paste of baking soda and water and apply it to the cleaned terminals.
Let it sit for a few minutes to neutralize any acid buildup. Finally, rinse the terminals with water and reconnect the negative cable, ensuring a tight connection. Repeat this process for the positive terminal. Remember to always disconnect the negative terminal first and reconnect it last.
Battery Switch Replacement Procedure
Replacing a faulty battery switch is a straightforward process, but requires careful attention to safety. Before starting, always disconnect both battery cables (negative first!) from the battery. This prevents accidental short circuits and electrical shocks. Then, remove any screws or fasteners holding the switch in place. Note the wiring configuration before disconnecting the wires from the switch.
This is crucial for correct reinstallation. Install the new switch, ensuring the wiring is connected exactly as it was before. Secure the switch in place and reconnect the battery cables (positive last!). Finally, test the switch to ensure it functions correctly.
Tools and Materials Needed for Battery Switch Replacement
Proper tools make the job easier and safer. Here’s what you’ll need:
- New battery switch (choose one with the same amperage rating as your existing switch)
- Wire brush
- Baking soda
- Water
- Screwdrivers (appropriate size for your switch)
- Wrench (if necessary, depending on your switch mounting)
- Safety glasses
- Gloves
Mastering your travel trailer’s battery switch is all about safety and efficiency. By understanding the different switch types, performing regular maintenance, and knowing how to troubleshoot problems, you’ll keep your RV running smoothly and avoid costly repairs. Remember, proper battery management ensures worry-free adventures, so take the time to learn and implement these tips. Happy travels!
Popular Questions
What happens if I leave my battery switch in the “off” position?
Leaving the switch off completely disconnects your house batteries from the charging system and any appliances. This prevents draining, but also means no power to your RV’s interior systems.
Can I use different types of batteries with the same switch?
While many switches work with various battery types (lead-acid, lithium), check your switch’s specifications and your battery’s compatibility. Incorrect pairings can damage your system.
How often should I inspect my battery connections?
Inspect your battery terminals and connections at least every three months, or more often if you notice corrosion or loose connections. Clean terminals with a wire brush and baking soda solution if necessary.
What causes a battery switch to fail?
Common causes include corrosion on the terminals, loose connections, internal switch failure, and even damage from overheating.
